Resin Printing FAQ
Basic FAQ
- What is resin printing? Resin printing, also known as stereolithography, is a type of 3D printing technology that uses photopolymer resin to create detailed and high-resolution 3D models.
- What are the benefits of resin printing? Resin printing can produce highly detailed and accurate prints with a smooth surface finish. It is also capable of printing intricate designs and thin walls that may be difficult to achieve with other 3D printing technologies.
- What are the disadvantages of resin printing? Resin printing can be more expensive than other 3D printing technologies and may require more post-processing. It can also produce harmful fumes and requires proper ventilation and safety measures.
- What materials can be used for resin printing? Resin printing typically uses photopolymer resin, which can come in a variety of colors and formulations, including standard, flexible, and high-temperature resins.
- What software is required for resin printing? Resin printing requires a slicer software, which is used to convert 3D models into printable files. There are several slicer software options available, including Chitubox, PrusaSlicer, and Simplify3D.
- What types of objects can be printed with a resin printer? Resin printing can be used to create a wide range of objects, including figurines, jewelry, dental models, and prototypes for product design.
- How long does it take to print a resin object? The printing time for a resin object can vary depending on the size, complexity, and resolution of the print. Small prints can take as little as a few minutes, while larger and more complex prints may take several hours or even days.
- How do I clean and maintain my resin printer? Resin printers require regular cleaning and maintenance to ensure optimal performance. This includes cleaning the resin tank, replacing the FEP film, and cleaning the print bed. It is also important to properly store the resin and dispose of it in a safe and environmentally friendly manner.
Advanced FAQ
- What is the optimal temperature for printing with resin? The optimal temperature for printing with resin can vary depending on the type of resin being used. Generally, resin prints best at a temperature between 20°C and 30°C, but it is important to check the manufacturer’s recommendations for the specific resin being used.
- How do I calibrate my resin printer? Calibrating a resin printer involves several steps, including leveling the build platform, adjusting the Z-axis, and checking the exposure time. It is important to follow the manufacturer’s instructions carefully to ensure accurate and consistent printing.
- How do I prevent resin from sticking to the build platform? To prevent resin from sticking to the build platform, it is important to ensure that the build platform is properly leveled and cleaned before each print. Using a release agent, such as a spray-on mold release or PTFE spray, can also help prevent sticking.
- How do I store and handle resin? Resin should be stored in a cool, dry place away from direct sunlight and heat sources. It should be handled with care and protective equipment, such as gloves and safety glasses, should be worn to avoid skin and eye contact. Resin should also be properly disposed of in accordance with local regulations.
- How do I troubleshoot printing issues? Printing issues can be caused by a variety of factors, including improper calibration, insufficient exposure time, or resin contamination. It is important to carefully review the printer settings and process to identify and address the root cause of the issue. In some cases, it may be necessary to adjust the printing parameters or change the resin formulation to achieve the desired results.
FAQ Resin Printing CAD
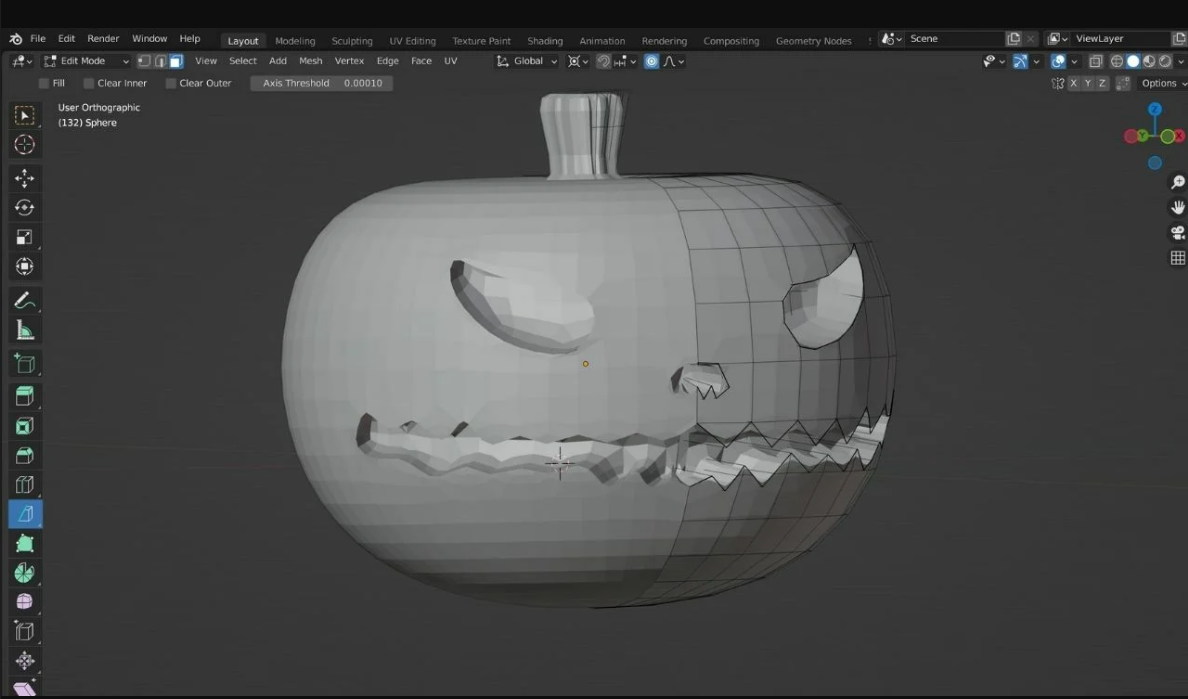
- What CAD software is best for 3D resin printing? -The best CAD software for 3D resin printing depends on your skill level and specific needs. Some popular options include Autodesk Fusion 360, Tinkercad, SolidWorks, and Blender.
- How do I export a 3D model from my CAD software to a file that my resin printer can read? -The most common file formats for resin printers are STL and OBJ. Most CAD software will have the option to export models in these formats.
- What are the recommended design guidelines for 3D resin printing? – Design guidelines for 3D resin printing include keeping wall thickness above the minimum recommended thickness, adding supports where necessary, and avoiding overhangs greater than 45 degrees.
- How can I optimize my CAD model for resin printing to avoid failed prints? -To optimize your CAD model for resin printing, you can adjust settings such as layer height, exposure time, and lift height in your printer’s software.
- What is the best way to add support structures to my 3D models in CAD software? -Most CAD software has tools for adding support structures, such as automatic support generation or manual support placement.
- How can I create hollow objects in CAD software for resin printing? -To create a hollow object in CAD software for resin printing, you can create a shell by subtracting the interior volume of your model from the exterior volume.
- What is the minimum wall thickness for 3D resin printing? -The minimum wall thickness for 3D resin printing varies depending on the resin and printer being used. Generally, walls should be at least 0.4 mm thick.
- How can I create intricate details in my 3D models for resin printing? -To create intricate details in your 3D models for resin printing, you can use tools such as fillets, chamfers, and booleans to create complex shapes and features.
- Can I use 2D images or photographs to create a 3D model in CAD software for resin printing? -Some CAD software has tools for creating 3D models from 2D images or photographs, such as Autodesk ReCap Photo or 123D Catch.
- How can I make sure my CAD model is watertight before printing with resin? -To make sure your CAD model is watertight before printing with resin, you can use the “check for errors” or “analyze” tool in your CAD software to detect any holes or gaps in the model’s surface.